AI-assisted coding
Using an agent CLI like Claude Code? Try marimo pair
This guide covers the AI assistant built into the marimo editor, which connects to an LLM provider that you configure. If you'd rather work with an agent CLI such as Claude Code, Codex, or OpenCode — driven from your terminal, on your existing subscription — use marimo pair instead, which gives your agent full access to your running notebook.
marimo is an AI-native editor, with support for full-cell AI code generation:
- generating new cells from a prompt
- refactoring existing cells from a prompt
- generating entire notebooks
as well as inline autocompletion (like GitHub Copilot).
marimo's AI assistant is specialized for working with data: unlike traditional assistants that only have access to the text of your program, marimo's assistant has access to the values of variables in memory, letting it code against your dataframe and database schemas.
This guide provides an overview of these features and how to configure them.
Locating your marimo.toml config file
Various instructions in this guide refer to the marimo.toml configuration
file. Locate this file with marimo config show | head.
Generating cells with AI
marimo has built-in support for generating and refactoring code with LLMs. marimo works with hosted AI providers, such as OpenAI, Anthropic, and Google, as well as local models served via Ollama.
Enabling AI code generation. To enable AI code generation, first install required dependencies through the notebook settings.
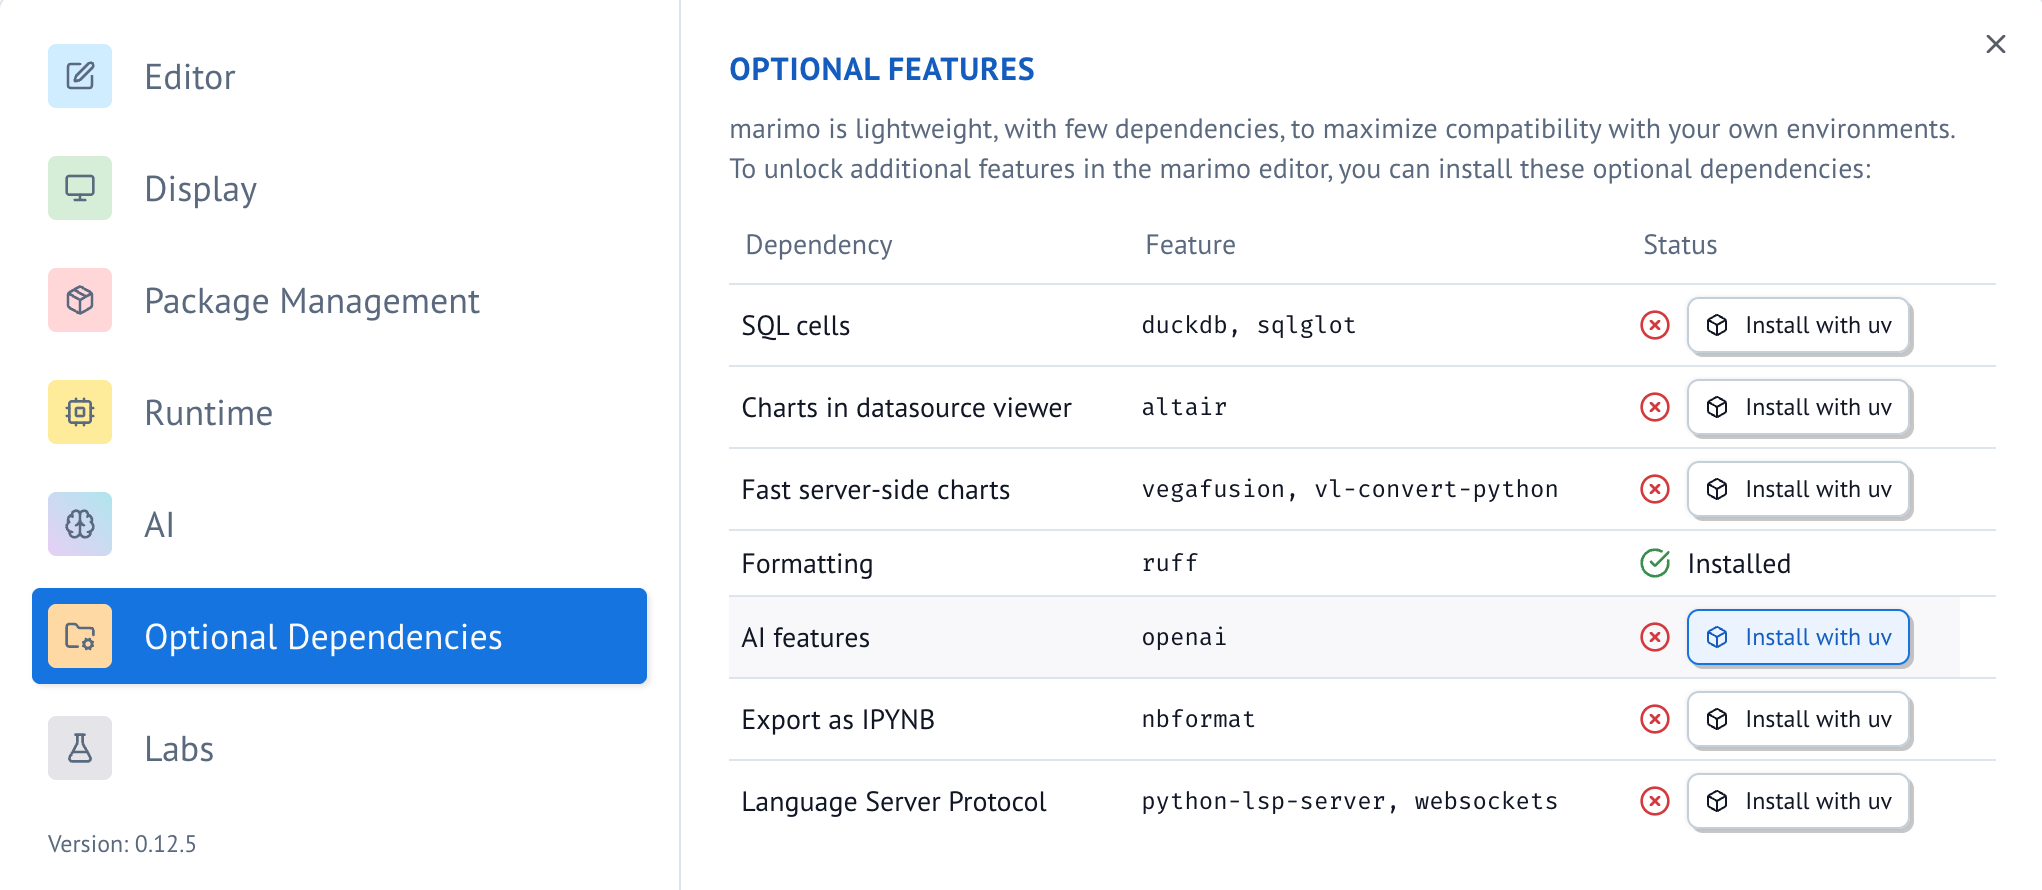
Then configure your LLM provider through the AI tab in the settings menu; see the section on connecting your LLM for detailed instructions.
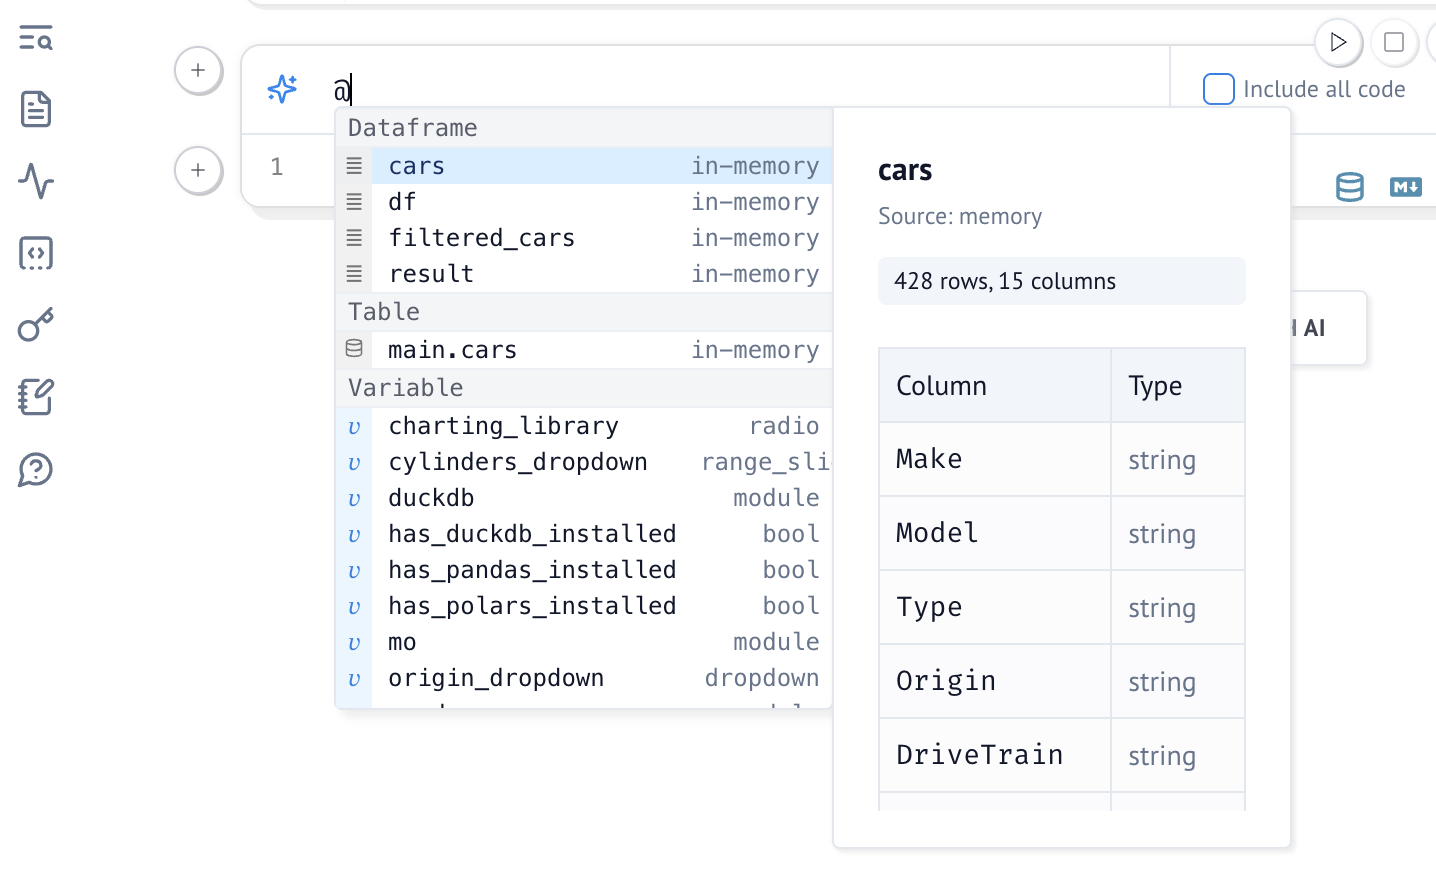
Variable context
marimo's AI assistant has your notebook code as context. You can additionally
pass variables and their values to the assistant by referencing them by name
with @. For example, to include the columns of a dataframe df in your
prompt, write @df.
Refactor existing cells
Make edits to an existing cell by hitting Ctrl/Cmd-shift-e, which opens a prompt box
that has your cell's code as input.
Generate new cells
Generate with AI button
At the bottom of every notebook is a button titled "Generate with AI". Click this button to add entirely new cells to your notebook.
Chat panel
The chat panel on the left sidebar lets you chat with an LLM and ask questions about your notebook. The LLM can also generate code cells that you can insert into your notebook.
The chat panel currently supports the following modes:
- Manual: No tool access; the AI responds based only on the conversation and manually injected context
- Ask: Enables read-only AI tools and tools from added MCP Client servers for context gathering, allowing the assistant to inspect your notebooks
- Agent: Enables all tools in Ask Mode plus additional tools to edit notebook cells (add, remove, update) and run stale cells
- Code mode: Gives the assistant access to the notebook kernel which allows the assistant to inspect the marimo runtime and manipulate the notebook in powerful ways.
See the chat panel in action
Generating entire notebooks
Generate entire notebooks with marimo new PROMPT at the command-line; see the
text-to-notebook docs to learn more.
Custom rules
You can customize how the AI assistant behaves by adding rules in the marimo settings. These rules help ensure consistent code generation across all AI providers. You can find more information about marimo's supported plotting libraries and data handling in the plotting guide and working with data guide.
For example, you can add rules about:
- Preferred plotting libraries (matplotlib, plotly, altair)
- Data handling practices
- Code style conventions
- Error handling preferences
Example custom rules:
Use plotly for interactive visualizations and matplotlib for static plots
Prefer polars over pandas for data manipulation due to better performance
Include docstrings for all functions using NumPy style
Use Type hints for all function parameters and return values
Handle errors with try/except blocks and provide informative error messages
Follow PEP 8 style guidelines
When working with data:
- Use altair, plotly for declarative visualizations
- Prefer polars over pandas
- Ensure proper error handling for data operations
For plotting:
- Use px.scatter for scatter plots
- Use px.line for time series
- Include proper axis labels and titles
- Set appropriate color schemes
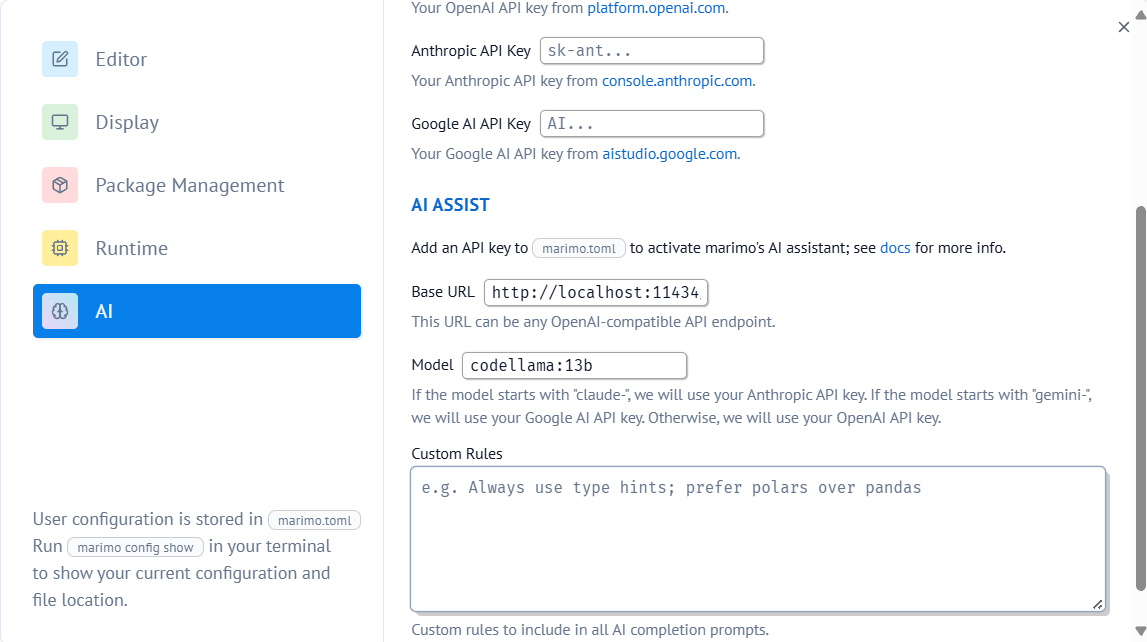
Connecting to an LLM
You can connect to an LLM through the notebook settings menu, or by manually editing
your marimo.toml configuration file. Prefer going through the notebook settings menu.
You can configure the following providers:
- OpenAI
- Anthropic
- AWS Bedrock
- Google AI
- GitHub
- Ollama
- and any OpenAI-compatible provider
See the llm_providers guide for detailed instructions on how to configure each provider.
Hide AI actions and panels
If you don't use marimo's AI assistant, you can hide AI actions and panels in the editor:
This hides AI assistant surfaces such as the Chat panel and Generate with AI. Code completion settings including GitHub Copilot, remain available.
You can still collaborate with an AI agent using marimo pair.
Agents
Experimental: Agents panel
marimo can also embed agents like Claude Code, Codex, and Gemini CLI directly in the editor's chat panel. Learn more in the agents guide.
Copilots
Copilots allow you to tab-complete code based on your notebook's context, similar to editors like Cursor.
GitHub Copilot
The marimo editor natively supports GitHub Copilot, an AI pair programmer, similar to VS Code:
- Install Node.js.
- Enable Copilot via the settings menu in the marimo editor.
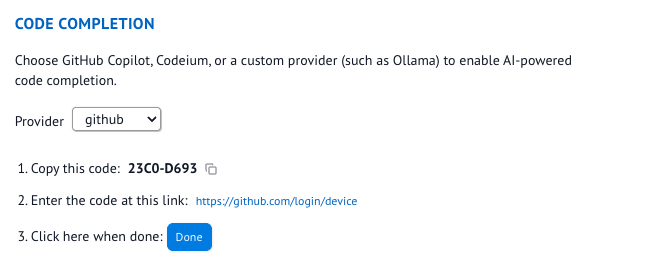
GitHub Copilot is not yet available in our conda distribution; please install
marimo using pip/uv if you need Copilot.
Advanced configuration
You can customize GitHub Copilot's behavior by adding copilot_settings to your marimo.toml configuration file:
[ai.github]
copilot_settings = { http = { proxy = "http://proxy.example.com:8888", proxyStrictSSL = true } }
Or in a more readable format:
[ai.github.copilot_settings.http]
proxy = "http://proxy.example.com:8888"
proxyStrictSSL = true

[ai.github.copilot_settings.github-enterprise]
uri = "https://github.enterprise.com"  # For GitHub Enterprise users
Available configuration options (these are the same settings directory from the npm package:
-
HTTP settings: Configure proxy settings for network connections
proxy: HTTP proxy URL (e.g.,"http://proxy.example.com:8888")proxyStrictSSL: Whether to verify SSL certificates for the proxy (default:false)proxyKerberosServicePrincipal: Kerberos service principal for proxy authentication
-
Telemetry settings: Control telemetry data collection
telemetryLevel: Level of telemetry to send -"off","crash","error", or"all"(default:"off")
-
GitHub Enterprise: Configure GitHub Enterprise Server
uri: URL of your GitHub Enterprise Server instance
Windsurf Copilot
Windsurf (formerly codeium) provides tab-completion tooling that can also be used from within marimo.
To set up Windsurf:
- Go to windsurf.com website and sign up for an account.
- Download the Windsurf app.
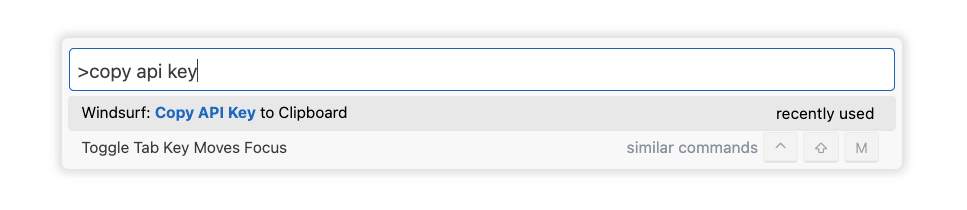
- After installing Windsurf and authenticating, open up the command palette, via cmd+shift+p, and ask it to copy the api key to your clipboard.
4a. Configure the UI settings in the editor to use Windsurf.
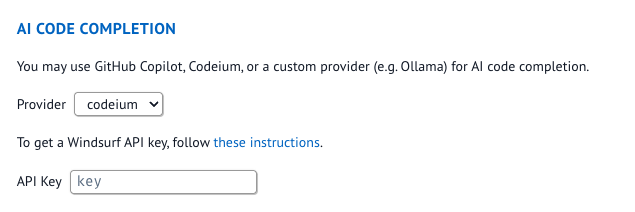
4b. Alternatively you can also configure the api key from the marimo config file.
Custom copilots
marimo also supports integrating with custom LLM providers for code completion suggestions. This allows you to use your own LLM service to provide in-line code suggestions based on internal providers or local models (e.g. Ollama). You may also use OpenAI, Anthropic, Google, or any other providers by providing your own API keys and configuration.
To configure a custom copilot:
- Ensure you have an LLM provider that offers API access for code completion (either external or running locally)
- Add the following configuration to your
marimo.toml(or configure in the UI settings in the editor):
The configuration options include:
autocomplete_model: The specific model to use for inline autocompletion.copilot: The name of the copilot to use for code generation.